Friday, July 30, 2010

Cherry Tomato Pizza Margherita...

You may think that our Friday Night Pizza this week, Cherry Tomato Pizza Margherita, looks a touch like that flatbread we made at the beginning of the month. However, looks are where the similarities stop - well, besides the fact we used a mess of heirloom tomatoes again, this time using those plump little cherry rounds.

We shaped our usual whole-wheat pizza dough into the same rectangle as the flatbread, though we went with the twelve-ounce version to give us a thinner crust. A pound of dough will work just fine, but I suggest you try to keep the end size the same, especially if you like a chewier bite! Because there will be ample toppings, once the dough was stretched out, we flipped about a half inch or so of the edges onto themselves, forming a thick containment rim all around. We used cornmeal on our work surface to keep the dough from sticking as we worked our mojo on it, but if you don't groove on the extra crunch, all-purpose flour does the job fine.

Unlike the beefy slices of raw tomato we used on that flatbread, these colorful gems were given a quick sauté in a hot skillet, with just enough olive oil to coat the bottom. You're not looking to cook them to death... just enough heat to give their skins a light char and rev up their juices. Scooped out into a bowl, the warm tomatoes were then hit with fresh garlic, crushed fennel seeds and pinch or two of crushed red pepper. I wanted them to retain most of their shape, so I didn't follow the original direction to smash the tomato balls to bits with a fork - do whichever you like, but I just liked the look of them better as is, rather than more of a "chunky sauce" consistency.

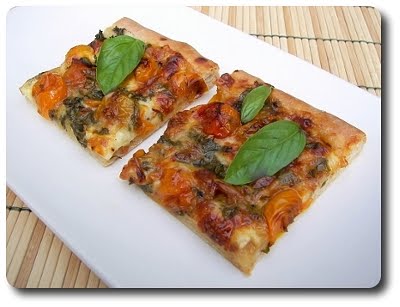
Two cheese were used - both mozzarella, one fresh (the kind packed in water) and the other of the whole-milk variety (low-moisture) that is much firmer. Both are diced and then jumbled around a bowl with chopped basil leaves to mingle the three together. With the cheese mixture scattered on the crust, the tomatoes are arranged over the cheese (if you mashed the tomatoes up, just spoon them on as evenly as you can), along with a light sprinkling of salt and pepper.

Into the oven, we gave a range on the time it takes to bake as it depends on how much dough you use - if you go lighter with the weight, check early to see how it's browning. After it comes out, we reinforced the basil with a few small fresh leaves added on top just before we dug in. The crust on the dough was firm, but the tomato mixture still retains a fair amount of moisture, which doesn't make for a ton of crunchy crispness. Partially baking the dough for 4 to 6 minutes before tossing on your toppings would help move the crust to that texture.

While you wouldn't find fennel on a Margherita pizza that strives to stay authentic, Jeff and I both quite liked the unexpected punch the crushed seeds gave this rustic pie - don't be tempted to leave them off!

Tuesday, July 27, 2010

Blueberry Mini Tarts...

Well, I couldn't help myself, I ended up buying yet another bucket 'o blueberries at the market this weekend. I'm going to do my best to get most of them in the freezer to enjoy at a later date, but we figured we should share the bounty and work the juicy gems into this week's Wednesday Treat Day. We decided on these Blueberry Mini Tarts for two reasons - they would be bite-sized treats that seemed like they should travel well and they read as being wickedly good!

The dough is a cinch to make, whirled around in a food processor to beat down the cold butter cubes into gravel-sized nuggets and is brought together with a drizzle of cold water. It's not the end of the world if you don't have a food processor - you can prepare the dough in a bowl with a pastry blender (or even your fingertips) and a sturdy wooden spoon - just work quickly to keep the butter cold and try not to overwork the pastry.

Divided into two discs, the dough needs time to rest in the refrigerator before you start working with it - 30 minutes should be enough, but you could also do this a day ahead of time (I did!) to get a head start. With "tart" in the name, you may think some fancy fluted baking tins are in order - however, you don't don't need them... a miniature muffin tin fits the bill just fine!

With the chilled discs of dough divided into twelve pieces each, the individual mounds are flattened out and snugly fit into each small well of the muffin tins. It's fine if you don't have two tins, just prepare one and then repeat the assembly process. The pans are now placed once again in the refrigerator to chill the butter in the dough, which will help the pastry keep its shape as it bakes.

As they chill, you'll be left with plenty of time to get the oven up to temperature and toss together the filling. Speaking of, the filling is not pre-cooked, in fact all it entails is throwing fresh blueberries into a bowl filled with a concoction of granulated sugar, cornstarch, fresh lemon juice, lemon zest and a pinch of salt to coat. Divided between the pastry-filled tins, the tarts are ready to bake until the crusts have browned and the berries release their juice, becoming bubbly and thick. The blueberries we used were fairly large and had to be piled high to get them all to fit... which looked nice as they went into the oven, but as they baked down, a little spillage was inevitable. Definitely not a big deal it all stayed on the pan (it wasn't overflowing or anything), but something to be aware of (and nothing a little hot soapy water won't cure!).

Crisp, golden buttery crusts, with a filling that has a bit of a sassy, tart attitude, these two-bite (or one, as Jeff just popped the whole shebang in) treats are just the right size to snack on without feeling too much guilt when you see only a crumb or two left behind on your plate. There is just enough sweetness in the center so you won't be puckering through your bites, but the blueberries still shine though, especially with the helping hand of the bright lemon zest and juice. They probably won't be winning any beauty awards, but that's no matter as taste wins every time - I may give them a dusting of confectioners' sugar before they go in tomorrow, just because I can't help myself!

Sunday, July 25, 2010

What we've been up to...

The farmers' markets out here have had extraordinary produce lately, especially the brilliant fresh sweet corn and bountiful buckets of luscious blueberries. We couldn't help buying way too much of both, so Jeff and I decided to go through some older favorites and repeat them on days we were not making new recipes.

Maybe you've seen these before on our site, or maybe you have just landed on our page today - either way, hopefully you'll be inspired to give one of them a try!


Friday, July 23, 2010

Spinach and Meatball Calzones...

I'm sure you guessed what we were doing with those reserved meatballs and sauce from last night's Quick Spaghetti and Meatballs... right? Especially since today was going to be Friday after all, meaning it happened to be our weekly Pizza Night! Yes, we took those two we swiped from that dish and made these Spinach and Meatball Calzones!

You could probably get away with just tucking the sauce and meatball mixture into the dough and call it done, but a couple extra steps and a few additional ingredients make all the difference. Instead of leaving the meatballs whole, we quartered each, making them not only easier to fit inside, but easier to eat by spreading the meat throughout the calzone, rather than in two giant lumps. Halving them would work too, but splitting them each into four feels like your getting a lot more meat as well!

With the smaller meatball nuggets added back into the sauce, we stirred in a mess of chopped spinach - you have two options with this, using fresh or frozen. We opted for the latter just because it was a time saver as all we had to do was thaw and squeeze it dry, but you could use fresh if you like - just wilt it down with a bit of water in a skillet, then remove as much liquid as possible and roughly chop.

Also into the filling went fresh basil (if you remember, we did add basil to the sauce last night, but it was stirred in after we separated the meatballs and sauce out for this), torn pieces of cheese from a ball of fresh mozzarella and a little extra salt and fresh ground black pepper to compensate for all that spinach.

With the pound version of our favorite whole-wheat pizza dough split into four balls, each was stretched out into a large round and topped with an equal portion of the meaty filling. Let me suggest using a slotted spoon for this since the sauce wasn't as reduced as it ended up being last night - a tight, thick filling is much better than a thin liquid-y one (there wasn't much left behind, maybe an extra couple tablespoons of juice)!

After a brushing of extra-virgin olive oil and a sprinkling of salt, just because, the calzones were baked until the half-moons were puffed, golden and the filling was hot, melting the torn pieces of cheese inside into gooey puddles. With its crusty bread exterior and warm, sauce-y insides, Jeff deemed these one of the best calzones yet - I'd gladly make last night's spaghetti dinner again, just to have the opportunity to give these another go!

Thursday, July 22, 2010

Quick Spaghetti and Meatballs...

When we moved out to Charlotte, we decided to sell Jeff's commuter car for several reasons, which means I've been driving him back and forth to work so I'd still have a vehicle to scoot around with. This has been working out well, especially not having to pay for parking everyday downtown - however, there has been one downside... I don't have as much time to play around in the kitchen making dinner!

Case in point with tonight's dish, Quick Spaghetti and Meatballs (it did have "30-minute" in the title, but it took slightly longer with our changes!). Not only was this fairly speedy to make, but I'll be swiping some of the components for tomorrow night's dinner - score!

The meatballs were the main time saver here by simply removing the casings from a few links of well-seasoned hot Italian fresh sausage (I used turkey) and rolling the meat into balls. They are slightly different in texture as there are no binders thrown in, but I found it to work fairly well - it was a bit sticky to work with, but dipping your fingers in water helps to keep your hands clean. You could even bang them out with a small scooper to make it even easier - I think a tablespoon cookie scoop would be about the right size, though make sure you clean it well before using it to make cookies again!

Use the same pot you are going to make it in to brown the meatballs, giving the sauce a boost by having it absorb all those caramelized bits stuck on the bottom. I do have one suggestion - if you don't think you can fit them all in without crowding the pan, do this in two batches so the meatballs attain those golden crusty edges, rather than steaming in their juices.

Next up was the sauce, but I did end up having to make a few changes to what the original recipe called for - it just didn't seem right if it only consisted of onion, tomatoes, salt and pepper. I'm sure it would have tasted fine, if a bit boring - no garlic or even fresh basil? Come on! Once the meatballs were done and out of the pan, a diced onion went in to cook just long enough to soften. We tossed in a handful of garlic cloves (5 to be exact), minced, along with Jeff's suggestion of dried oregano and a big pinch of crushed red pepper. There is a range given for the pepper as you'll want to add this to your heat tolerance - go light for a bare zing, or all out for a spicy kick.

With a couple cans of whole, peeled tomatoes going in (crush them with your hands as you add them), the sauce bubbles for a few minutes before the meatballs go back in to finish cooking through. This is where we break for a second - a portion of the meatballs and sauce are set aside, while the rest stay in the pot for dinner. Where do they going? Check back tomorrow night!

When the pasta had almost completely cooked through (drain it a minute or two before al dente), the strands were drained and tossed into the sauce pot to finish cooking through in the quick sauce, soaking up any extra juice from the tomatoes. We did give a range on the amount of pasta - we went with twelve ounces for four servings and were pretty satisfied, however, bump it up to sixteen for larger portions. Before serving, we hit the pot with chopped fresh basil and a drizzle of quality extra-virgin olive-oil (though you don't have to add the oil, we poured just a touch for good measure).

Again, the recipe didn't call for it, but our plates seemed to scream for a smattering of Parmesan, which we obliged with a few grates from a wedge we had in the refrigerator. While this definitely won't replace a traditional Spaghetti and Meatball dish with a long-simmered sauce and tender, triple-meat meatballs, take it for what it is - a simple pasta dish with spicy sausage and a snappy sauce that one can doctor to their own taste.

Tuesday, July 20, 2010

Chocolate Sugar Cookies...

We've had some doozies lately for the Weekly Wednesday Treat Day and we thought it would be good to take it down a notch with a not-too-complicated treat for a change. However, we couldn't just do a plain cookie, now could we? Jeff suggested some sort of sugar cookie and I liked that idea, but wanted to go one step further and give these Chocolate Sugar Cookies a try!

You have a couple options when you make the dough - as we made it, we used shortening, which gives the cookies structure and texture. I know not everyone is a fan and if you would rather not use it, an equal amount of butter can be substituted - however, note that they will tend to be thinner as the butter will make them spread more. They will also run a bit crispier throughout, where as if you opt for shortening, these cookies will be softer (not in a cake-y sense, though) with a bit more chew to them in the center, yet still retain a crispness around the edge.

You don't have to do this next step, but to lift the chocolaty-ness of the cookies, I added just a half teaspoon of instant espresso powder into the dough. It won't be enough to give you a buzz or make them taste like a cup of coffee, but it works as a megaphone to amp up the more subtle and underrated tones of the chocolate. The recipe actually had "Giant" in the title, but we decided to go with smaller cookies, using a generous heaping tablespoon cookie scoop to measure out the dough - if you want them as large as your head, dish out the dough with a large 2 1/2" scooper and add several minutes to the bake time.

As with most chocolate cookies, checking for doneness isn't always as visual as it is with a pale dough. Your best bet is to rely on touch and your nose - they were done for us when the edges of the cookies were firm and the rich smell of chocolate was pouring out of the oven. I liked that these thick cookies were not so decadent that you only get through half before it became too much, but they were also not so plain that they needed frosting to make them enjoyable - a tasty balance between ordinary and extraordinary! If you would like to exaggerate the cracks on top, roll the dough balls through a drift of granulated sugar just before baking.

Sunday, July 18, 2010

Creamy Polenta with Sausage

There really isn't a whole lot to tonight's dinner... olive oil, a couple fistfuls of good cheese, coarse yellow cornmeal, broth, a knob or two of butter and a few links of quality sweet Italian turkey sausages are pretty much all we used. However, the simplicity of this Creamy Polenta with Parmesan and Sausage is what made this meal immensely enjoyable for us!

Using coarse cornmeal is what makes this polenta shine, but realize it will take a bit of time as it won't be done in five minutes like that finer-grained instant variety. The technique used to cook the cornmeal takes a slightly different route from the norm, but I think that was one of the reasons I was attracted to the recipe. Instead of streaming the grains into boiling liquid, whisking all the while, you marry the cornmeal with an equal amount of cooking liquid (broth in our case, but you could use water) in your pot, then bring it up to a bubble to start the process. Do be sure to introduce salt here as well, but how much you add will depend on what liquid you use - be a little more aggressive if you are using water, less if broth.

What this does is basically make a slurry, suspending the cornmeal in liquid, removing any worry of lumps. Then, you'll just need to cook and stir in your liquid of choice (more broth or water), as necessary, to keep the grains loose and smooth until the cornmeal tastes creamy and not too grainy. If using a true coarse cornmeal, expect this to take at least a half hour, though I would start tasting around twenty minutes just to see. If the mixture stiffens up too much on you, simply cook in a bit more water to loosen the polenta up. I liked this way over starting with a whole pot of liquid to begin with because you don't have to wait for all that liquid to heat up, but mainly because I found it sputtered and spit much less hot cornmeal as it simmered than it usually would.

As the polenta was puttering along, we cooked the sausages in a couple tablespoons worth of olive oil until they had browned on all sides and were completely cooked through. It may seem heavy on the oil for four sausages at first look, but they are already quite lean as they are turkey links and it does take some time for them to cook.

You're looking for the polenta to have a soft, somewhat fluid consistency (think sour cream) when done, into which we folded the nutty fresh grated Parmesan cheese, butter and plenty of black pepper (do check for salt after you've stirred in the cheese). You could place a full link right over the plated polenta, but take the extra minute to slice the links into coins to serve them on top.

Thursday, July 15, 2010

Pea and Parsley Pesto with Linguine...

We haven't planted anything this year as we didn't have any time to get the soil ready or even an area picked out that gets plenty of bright sunlight... we do, however, have a few herbs growing on the patio in pots. Our basil plants are doing extraordinarily well (I sent a bunch in with Jeff a couple weeks ago to share), as is our thyme and rosemary pots... parsley, not so much though. We had good luck with that in Minnesota, but it seems to be growing very, very slow here - perhaps too much heat?

I was hoping it would spring into action so I had enough to make this Pea and Parsley Pesto with Linguine, but after waiting for it to catch the rest of the plants, I gave up and just picked up a healthy bunch at the farmers' market this past weekend.

To prepare the pesto, you'll need give the peas a quick dip in a pot of boiling, salted water. However, don't bother dirtying a small pan for this. Use a large enough pot that you can cook the pasta in and instead of draining the water away when the peas are done, take them out with a slotted spoon and use the same water to do the pasta. The cooked peas went into a food processor, along with parsley, a handful of toasted walnuts, sharp Parmesan cheese, three cloves of smashed garlic and a tablespoon of water (just swipe a scoop from the pea cooking water).

After a few quick pulses to make a garlicky, thick paste, the processor is set to auto, with a steady stream of fruity extra-virgin olive oil poured in, blitzing the ingredients together and creating the pesto. Wait to season with any salt until you taste a small spoonful of the pesto - with the Parmesan, you may not need as much as you think. The pasta is then dropped into the pot of pea cooking water (brought back up to a rapid boil first) and just before it tests done, a cup of peas are tossed in to warm through. Before you drain away the water, reserve a cupful of the starchy liquid to be used in a second.

With the pasta and peas put right back into the same vessel, a few heavy spoonfuls of the pesto is added in, along with enough of the reserved liquid to give the pesto a consistency to soak each strand of pasta well. While there is plenty of cheese in the pesto, you can't go wrong scattering a bit more over each portion once you've plated the pasta, which we of course did! The sweetness from the peas was a nice change of pace from your regular, in-your-face basil pesto, especially paired with the nuttiness of the toasted walnuts and sharp cheese. The addition of whole peas into the mix was a great idea, not only tying the pesto and pasta together, but for also bringing little juicy bursts of freshness in each forkful.

A head's up on that vibrant pesto: if you stick to the recipe, you will only end using about half for this recipe. You could double the other ingredients (pasta and other cup of peas) to serve a group or do as I did and freeze the leftovers - it will be handy to have it around for those nights when we need a speedy pasta dish for dinner. If I don't end up using the extra for another pasta dish, it just might make for an interesting spread on a pizza or a sandwich!

Tuesday, July 13, 2010

Double-Butter Bars...

I have a bar cookie to share with you today that we made for the Weekly Wednesday Treat Day, but let me tell you now, these gems are definitely not your ordinary type of cookie! You can tell these are going to be special by the name, Double-Butter Bars, however, the name may lead you down a different road than these will actually be going!

If you wanted to get technical, you could call these "Triple-Butter", but the butter in the title isn't referring to the actual butter used, rather the combination of smooth, creamy peanut butter and a generous handful of butterscotch chips. A bowl and sturdy wooden spoon would work to prepare the dough, but let me suggest using either a stand mixer or hand blender - the dough is fairly thick and stiff, making it a bit difficult to combine without the extra power.

You'll note the use of a couple egg yolks in the cookie base, but don't toss away the whites - you'll be using them separately in a moment. We like the idea of butterscotch and peanut butter playing together, but you don't have to follow suit - instead of butterscotch, think about using bittersweet chocolate chunks or chips, or if you're a real peanut butter hound, peanut butter chips. To keep the theme going, we also tossed in chopped peanuts, but those could just as well be swapped out with say, toasted almonds or pecans. You are really just looking for a bit of texture inside the bars, along with an ingredient that can break up the sweetness.

Scooped into the baking pan and spread smooth, these bars need one more touch before they are ready for the oven. Remember those lone egg whites? The two we saved were whipped into a thick and creamy brown sugar meringue, then spread over the top of the unbaked bars! Seems crazy, but don't think about skipping this - this unique step brings a whole new dimension. The meringue directions did not specify if the whites should reach the stiff peak stage, so I let the meringue beat until it was very thick, glossy and when I turned the bowl upside down, they didn't slide out.

There is one caveat to that topping - it won't be as easy to tell when the bars have baked through since the dough has been hidden. I skipped the toothpick test and followed the time on the recipe, with the note that the top of the meringue to be golden brown. If you do have any doubts on your oven temperature, you may want to check just to be sure.

Left to cool completely, to help your knife glide through the meringue when cutting, give the blade a quick spritz or two with cooking spray. I was going to wait until Jeff got home to give these a try, but the peanut butter scent that wafted off them as they cooled was too much to resist! The bottom of these bars is rich, chewy and fairly dense, while that airy meringue second layer contrasts wonderfully with its light texture. Peanut is definitely the highlighted flavor with the full cup of peanut butter in the bars, along with the crunchy nuts scattered throughout, but I have to say I loved biting into the tear-shaped drops of butterscotch chips too, adding a killer layer of pleasing decadence.

Sunday, July 11, 2010

Pumpkin and Millet Muffins...

We've worked millet into several different savory recipes over the years, but did you know it can also sway into the sweet realm as well? We used those tiny golden-hued pearls to prepare these Pumpkin and Millet Muffins.

Rich in protein, fiber and magnesium, the millet was first added to a dry skillet to toast, increasing their crunch factor, while boosting its natural nuttiness at the same time. You'll know when they have been over the heat long enough when they begin to pop and darken slightly.

All-purpose flour, along with an equal amount of whole-wheat pastry flour, are whisked together with our favorite Vietnamese cinnamon, exotic cardamom, fresh grated nutmeg, a touch of clove for warm, spicy note and of course, baking powder and baking soda for a nice rise. I like using the lighter whole-wheat pastry flour as it doesn't compromise the texture of the muffins and adds an amiable nutritional hike. You could just as well use regular whole-wheat flour instead (though the muffins will be denser) if you can't locate it, or if you don't like either of those options, just use entirely all-purpose flour instead. The toasted and cooled millet is also brought into the mix at the point.

To turn the dry ingredients into a thick batter, mashed pumpkin (yes, canned is fine), milk, a few dollops of tangy sour cream, a duo of granulated and brown sugars, an egg and melted butter are combined to be poured in. Once those ingredients are added, you only want to give the mixture a few good stirs to incorporate - you don't want to see streaks of flour, but lumpy batter is just fine. The lumps will work out themselves out as the muffins bake. If you try to get the batter perfectly smooth by lots of stirring, the gluten in the flour begins to overdevelop, leading to a tougher muffin, riddled with holey-tunnels.

If you like your muffins to have a softer exterior, go ahead and line your tin with paper liners - Jeff and I, however, love that crusty base that forms when you simply use butter or nonstick spray. I know I mention this next part almost every time we bake muffins or cupcakes, but I think it is worth it - as soon as they test done, only let them sit in the pan for a few minutes before whisking them out onto a wire rack to cool. If they are left to sit in the tin to cool completely, the bottoms will start to steam and make for a tough muffin.

With a pleasant, albeit mild, pumpkin background to these tender and moist muffins, I took notice on how upfront the spices were, yet they seemed to accent the pumpkin rather than take away. I don't know that the millet added much in the way of flavor, but I loved the delightful contrasting crunch the little seeds brought into the mix. Muffins can often be so sweet that they might as well be served as dessert, but I didn't find that to be the case here - just enough sweetness for a decent on-the-go breakfast or portable snack.

Friday, July 09, 2010

What was in that Stuffed Pizza again?

While we do the majority of our food shopping over the weekend, lately I've been going out during the middle of the week to refresh produce and either pick up ingredients we forgot to get or if we changed our mind on a recipe and needed other supplies. This also has a wicked bonus - since Jeff is at work, I'm able to sneak certain ingredients into the house that he tends to use "Veto Powers" on. You know, the usual suspects... tofu, mushrooms, anchovies or other interesting condiments that he swears he doesn't like, but enjoys more than he realizes.

This worked in my favor this week in fact, as I needed to pick up one of those ingredients to make this Spinach and Sun-Dried Tomato Stuffed Pizza for our weekly Friday Night Pizza. The title doesn't even give it away, which is why Jeff didn't blink an eye as I read the menu for the week to him, but little did he know he was once again going to be eating tofu!

As our whole-wheat pizza dough was off rising, the bulky filling was brought together by tossing crumbled tofu, spinach, soft sun-dried tomatoes, pecorino Romano, mozzarella, fresh basil, a couple cloves of minced garlic and onion powder in a mixing bowl. A couple tips - the tofu you are looking for is packed in water, usually found in a refrigerated case located in the produce department. Drain away the water, crumble the block into pieces (you don't have to go too fine, but try to get the pieces no larger than small marbles) and then pat the tofu dry with a couple paper towels for added insurance against sogginess. The sun-dried tomatoes we used were soft and very flexible, however not all kinds are the same. If you pick up a pack that are on the drier/hard side, set them in a heat-safe dish and pour boiling water over them - after a twenty minute rest, they will have softened right up.

The dough needs to be stretched or rolled out into a pretty large rectangle for the stuffed pizza - the original recipe called for the dimensions to be around 16" x 18", but our dough was pretty thin at 16" long x 13" wide and I didn't want to risk tearing it by going any thinner. My suggestion is to just work the dough until it has become as large as you can comfortably get it. If it starts to spring back, but you think you can stretch it more, cover the dough and let it rest for 10 minutes to give the gluten a break, then have at it. Since the assembled pizza is going to be pretty heavy, it is best to go ahead and transfer the naked dough to the baking sheet, then pile on the tofu, cheese and spinach filling.

With the tofu mixture packed onto one half of the dough, the clean side was brought over to meet the other side, enclosing the filling to make a tidy package. To make sure all those ingredients stay inside, take the time to seal the edge closed with a fork - if you find the fork sticks to the dough, lightly wet the tines. Brushed with olive oil, a few slits are made on top of the package to allow steam to vent, preventing any unwanted blowouts.

You may be thinking, how did I manage to get all of this done without Jeff seeing the tofu? That's where Gus came in handy - Jeff was distracted by keeping him entertained upstairs with a new toy, so he didn't notice my secret tofu activities in the kitchen. I figured he would start questioning the filling as soon as we cut into the pizza slab, but the crumbled tofu kind of looked like feta cheese scattered in between all that spinach!

He knew something was up halfway through his piece, probably because I couldn't help myself by watching him eat to see if he started picking at the filling to figure out what was inside. I let him in and he didn't even flinch! He said it didn't scream tofu at all and it came across as more of a soft cheesy texture more than anything. Between the two cheeses, one salty and sharp, with the other more creamy, intense sun-dried tomatoes, fresh garlic and sweet, vibrant-ness of the basil, any concerns of a bland filling quickly flew out the window at first bite. Don't let the tofu scare you away... you might be surprised with just how much you (and your other eaters) like it in this dish!

Tuesday, July 06, 2010

Mini Chocolate Chip Scone Nibbles...

Jeff was off work yesterday and we decided to take advantage of the downtime by bumming around and doing nothing but catch up on movies we've been meaning to see. Not even realizing what yesterday was, it hit me when I sat down to write out the Weekly Wednesday Treat Day post that it also happened to be our five year anniversary of the blog! 5 whole years? I definitely did not imagine I would stick it out this long when we started our adventure, but I'm happy that we didn't give up.

I know we haven't been posting every. single. day. like we used to, but that's mainly because I haven't be able to carve out the time needed to write the posts. We are still making new recipes at least once a day, however, and my to-write-about-pile is getting larger by the day. I may have to change formats for a few weeks to get caught up, but I'll do my best to get them all up on the site! Now, let's get back on schedule and get to this week's treat - Mini Chocolate Chip Scone Nibbles!

I haven't made scones in ages and treat day is a great excuse to make a giant batch - a few saved for us, with the rest going into the office to make room to make another sweet later in the week! Flour, vanilla sugar (my jar had been stewing for awhile and calling to be used, but regular granulated is fine), baking powder, salt and eight cold tablespoon pats of butter are worked together until the firm butter has been coated in flour and broken down into uneven pea-sized nuggets. You can work the butter in a few ways - a pastry blender, two knives, a food processor (which works great, but I didn't feel like cleaning the bowl) or take the minimalist route and simply squeeze the ingredients together with your fingers.

Miniature chips are then stirred into the bowl to allow for a very even distribution of the chocolate (they also keep their shape well) - however, if you're after a darker bite, feel free to break down a block of bittersweet into small pieces and toss that in instead. To bring the dough together, a combination of eggs, vanilla and half-and-half are whisked together and poured in to combine. There is a range on the half-and-half because you may need more liquid - if the dough feels dry or won't come together, drizzle in enough to make the dough moist and tacky. You could use milk (not as rich) or cream (definitely indulgent) if you like, but half-and-half is an excellent compromise between the two.

Patted out into a large square (don't be shy on dusting your work surface with flour - sticking would not be pretty!), we divvied it up into sixteen smaller squares, then divided each in half on the diagonal, making a mess of small triangles. Even though you start out with cold butter, all that working of the dough manages to soften the butter quite a bit - we can fix that though with a brief stint in the freezer while the oven preheats. The cold will firm the butter back up, allowing the nuggets to take longer to melt when it hits the hot oven, giving the scones the best rise possible.

Even though they are semi-frozen, the scones won't take very long at all to bake - they are ready to come out as soon as their shell turns golden brown. Since the scones have a bare amount of sugar added into the dough, to give them a little extra note without killing them with sweetness, we bathed each in thin concoction of confectioners' sugar and water, doused with an extra splash of vanilla. This also has the benefit of sealing the crust, helping them to stay fresh and not dry out.

Thankfully I had an errand to run right after I glazed them as I don't think I could have waited for the glaze to set to give one (or three.. they are small!) a try if they were resting anywhere near me. You can be sure it was the first thing I did when I got home though! Biting through the set sugar shell and crusty exterior of the scone led me to a tender, soft interior, with just enough chocolate in every single bite. Jeff tasted one right when he got home and could tell by the look on his face he was pleased. Before I knew it, he distracted me by asking for a pen and as soon as I left the kitchen, I heard him run up the stairs - when I looked at the cooling rack with the scones, two more scones had vanished! That alone gave me the review I was waiting for.

Sunday, July 04, 2010

Happy Fourth of July 2010!

Happy Fourth of July!

Jeff and I are taking Gus up to the lake today, hoping to score a nice grassy spot to sit, enjoy the unusually nice weather and dig into an array of snacks. Gus is already anxious to get there as he knows there are toys and a certain peanut butter laced kong waiting for him!

I gave Jeff a few new recipes to look through, but he had other ideas in mind of what would be good today - he had picked out repeat recipes that he's been wanting to eat again. Here's a snapshot of what we are packing the cooler with...


English Lemon Shortbread Strips

Jeff, Gus and I hope everyone has a safe holiday - enjoy your day today!

Friday, July 02, 2010

Heirloom Tomato Flatbread...

Let me start out this post with a bit of a confession... while today is Friday Pizza Night and I do have a pizza to share, we didn't make it this evening. We had picked up a few stunning heirloom tomatoes at the farmers' market last Saturday and it wouldn't have been right to let them just sit around until today to use them. Instead, we decided to go ahead and prepare this Heirloom Tomato Flatbread with Goat Cheese that night, even though we just had that Apricot and Prosciutto Pizza the day before!

You'll need about a pound of dough for the base, whether it be freshly made at home using our favorite whole-wheat pizza dough, a pouch you grabbed at the market on the way home or even a ball of dough from your local pizza joint. To give the bottom of the crust a rough bite, we stretched the submissive dough on a dusting of cornmeal, shaping it into a rectangle slightly larger than a jelly-roll pan. If you're not a fan of the crunch it adds, all-purpose flour works too - just use enough to keep the dough from sticking. To make sure all the ingredients are contained (and besides the fact it wouldn't fit on our pizza stone in this shape anyway), the dough was then slid onto a baking sheet and pressed into the corners for a snug fit.

Why not just plop the dough into the pan and shape it right into place to begin with? I thought the same, but found it was easier stretching (and keeping it at an even thickness) the dough on the counter, rather than dealing with the confinement of the pan - do whichever method works best for you. To give the dough a bit of heft and chew, the pan was covered and left to rest until it became very puffy and almost doubled in size.

While the dough took a break, we didn't - the toppings needed time and attention before they were ready to add on top. The colorful fresh tomatoes are fairly juicy and while that is useful in other recipes, it would wreak havoc on pizza, most likely making for a soggy, drenched crust. However, we still wanted them to keep their sleek, beautiful form in slices... rather than squishing or squeezing out their juices, we laid the rounds on a few layers of paper towels (along with a few more on top) to let them drain. While the tomatoes drain, be sure to give them a loving press once in awhile to help the process along - by the time the dough is ready, enough liquid will have been absorbed by the paper towels.

With the tomatoes arranged on top of the risen dough, we followed them up with a generous helping of creamy goat cheese crumbles and a light sprinkling of salt and fresh ground black pepper. Baked to crisp the crust and give a golden hue to the tangy cheese, once the pizza was done, we took the slab out of its metal carriage and let it cool briefly before adding the final touches - fresh chives, parsley, small whole basil leaves and an extravagant drizzle from a bottle of quality extra-virgin olive oil.
Would this still be as good with regular tomatoes? I think so, as long as they are fresh and in-season, since much of the flavor of this pizza is banked on what you use on top - I wouldn't make this in the middle of winter. Jeff questioned the indulgent olive oil drizzle as a condiment at first, but we found its fruity notes were able to compliment and lift the tomatoes more when added as is, rather than baked into the crust with a blase of heat. And for those wondering, we did still have pizza tonight, though it wasn't a new recipe - we had those Individual Ham and Egg Pizzas again, using prosciutto instead of the ham.